
运行时
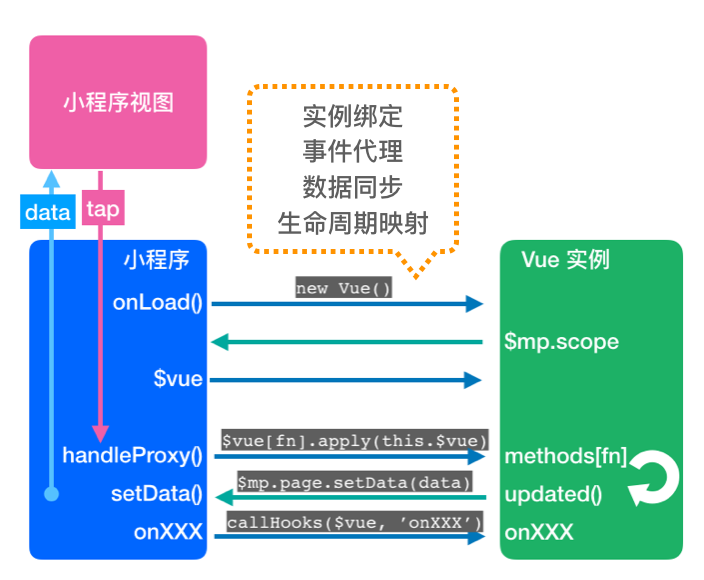
从该运行时示例图中可以看到Vue运行时与小程序运行时之间的关联主要包含下面几个:
- 实例绑定:createPage 具体实现是怎么样的?
- 事件代理:handleProxy 和 data-tapeventproxy 是如何实现事件的代理?
- 数据同步:Vue 响应式系统数据绑定在小程序中如何实现?
- 生命周期映射:mounted 生命周期事件如何在小程序里面怎么执行的?
我们接下来看看这几个点是怎么实现的。
运行时源码目录
在Mars中mars-core是运行时源码部分,我们来看一下其目录结构:
├── base
|   ├── api                # 小程序 API Promise 化
|   ├── vue                # Vue Runtime
|   ├── createApp.js       # 创建 App 代理层
|   ├── createComponent.js # 创建 Component 代理层
|   ├── createPage.js      # 创建 Page 代理层
|   ├── data.js            # 数据同步
|   ├── lifecycle.js       # 生命周期映射
|   ├── mixins.js          # 混入
|   └── state.js           # 全局状态
├── h5
├── helper
|   ├── deepEqual          # 深度相等校验工具类
|   ├── instance           # 获取页面实例工具类
|   ├── perf               # 性能测试工具类
|   ├── props              # 属性的工具类
|   └── util               # 通用的工具类
├── swan
├── wx
├── config.js
└── index.js运行时入口
在编译器那阶段我们分析了一下,运行时是通过webpack将@marsjs/core/src/wx作为入口打包成js文件,放在变异后的微信小程序工程中的mars-core下的index文件中。
所以createApp函数我们从@marsjs/core/src/wx中寻找一下。
//src/wx/index.js

/**
 * @file  runtime entry
 * @author zhangwentao
 */
import config from '../config';
config.$platform = 'wx';
export const $platform = 'wx';

export {config};

export {default as $api} from './nativeAPI';
export {default as createApp} from './createApp';
export {default as createPage} from './createPage';
export {default as createComponent, vueCompCreator} from './createComponent';
export {default as Vue} from '../base/vue/index';首先,导入了一个名为config的模块,将config.$platform属性设置为'wx',然后导出config。接着,导出了一个名为$platform的变量,其值为'wx'。
接着,导出了$api、createApp、createPage、createComponent、vueCompCreator对象。
App() 函数
微信小程序开发文档中对于App的定义是:App函数是用来注册小程序。接受一个 Object 参数,其指定小程序的生命周期回调等。
App()函数编译
我们先看一下Vue中的app如何编译到小程序中的。
//app.vue
<script type="config">
{
    config: {
        pages: [
            'pages/home/index'
        ],
        window: {
            navigationBarBackgroundColor: '#3eaf7c',
            navigationBarTextStyle: 'white'
        },
        networkTimeout: {
            request: 30000
        }
    }
}
</script>

<script>
export default {
    onLaunch() {},
    onShow() {}
};
</script>编译到微信小程序中主要有:app.js、app.json和app.wxss。
//app.js
import { createApp } from "./mars-core/index";
App(createApp({
  onLaunch() {},
  onShow() {}
}));//app.json
{
"pages":["pages/home/index"],
"window":{
"navigationBarBackgroundColor":"#3eaf7c",
"navigationBarTextStyle":"white"
},
"networkTimeout":{"request":30000},
"usingComponents":{}
}我们先看看微信小程序 App原来构造器格式是:
App({
  onLaunch(options) {},
  onShow(options) {},
  onHide() {},
  onError(msg) {},
  globalData: {}
});我们可以看出Vue编译之后生成的代码对App函数的参数进行了包装,包装主要使用了@marsjs/core中的createApp方法。我们先来看一下其定义。
createApp详解
我们找到createApp代码如下:
//src/wx/createApp.js

import {makeCreateApp} from '../base/createApp';
import $api from './nativeAPI';

export default makeCreateApp($api);然后我们找到makeCreateApp函数的定义:
import {state} from './state';

export function makeCreateApp($api) {
    return function (options) {

        if (options.store) {
            state.store = options.store;
        }

        options = Object.assign(options, {
            $api,
            __pages__: {
                uid: -1
            }
        });

        return options;
    };
}makeCreateApp 是一个闭包函数,返回值是一个函数,并且将 $api 和 其中uid属性的值为-1的__pages__ 对象挂载在 options 上,并注入到小程序 App(options) 中,同时全局的 store 对象通过 options.store 传入进来,提供了对 Vuex 的支持。我们可以初步看出 mars 框架中 Vue 与 App 相关的主要是全局的状态管理。
Page() 函数
微信小程序官网中对于Page的定义是:注册小程序中的一个页面。接受一个 Object 类型参数,其指定页面的初始数据、生命周期回调、事件处理函数等。
Page() 函数编译
我们先来看看vue中的script是编译到小程序的代码:
//vue中
<script>
import Hello from '../../components/Hello/Hello';

export default {
    data() {
        return {
            isShow:true,
            list: [{
                name:'xiaoming'
            }]
        };
    },
    components: {
        Hello
    },
    methods:{
        navigateToLogin(){

        }
    }
};
</script>//小程序中
import { createPage } from "../../mars-core/index";
import Hello from "../../components/Hello/Hello.vue";
Component(createPage({
data() {
return {
isShow: true,
list: [{
name: 'xiaoming'
}]
};
},
components: {
Hello
},
methods: {
navigateToLogin() {}
},
render: __renderFunction
}));;
function __renderFunction() {return ({ render: function() {var _vm=this;var _h=_vm.$createElement;var _c=_vm._self._c||_h;return [,[,[[{'content':_vm.content}]],,[[_vm._pp({'compId':(_vm.compId ? _vm.compId : '$root') + ',0'})]],(_vm.isShow)?[]:[],_vm._l((_vm.list),function(item,index){[,[(item.name)]]})]]}, staticRenderFns: [] }).render.bind(this)();
}这里我们编译后最终Page页面使用的是Component函数替代Page函数了。
我们先看看微信小程序 Page 构造器:
Page({
  data: {
    text: "This is page data."
  },
  onLoad(options) {},
  onReady() {},
  onShow() {},
  onHide() {},
  onUnload() {},
  onPullDownRefresh() {},
  onReachBottom() {},
  onShareAppMessage() {},
  onPageScroll() {},
  onResize() {},
  onTabItemTap(item) {},
  // Event handler.
  viewTap() {},
  customData: {
    hi: "MINA"
  }
});其中使用了createPage对参数进行了包装,我们看一下createPage函数的定义。
实例绑定
createPage源码如下:
//src/wx/createPage.js
import pageMixin, {handleProxy, handleModel} from './mixins';
import {setData} from './data';
import {callHook} from './lifecycle';

export default makeCreatePage(pageMixin, {
    handleProxy,
    handleModel
}, setData, callHook);我们首先要看整体的结构,makeCreatePage 有四个参数:
- pageMixin:页面 Mixin 通用的对象
- handleProxy 和 handleModel:事件代理
- setData:数据同步
- callHook:生命周期钩子
我们先看一下这四个参数的定义:
pageMixin、handleProxy、handleModel都在mixins.js中,所以我们一起来看一下。
pageMixin
pageMixin的源码如下:
//src/wx/mixins.js
import $api from './nativeAPI';
import {makePageMixin, makeGetCompMixin} from '../base/mixins';

export {handleProxy, handleModel} from '../base/mixins';

export const getCompMixin = makeGetCompMixin($api);

export default makePageMixin($api);pageMixin是makePageMixin方法的调用,并传入了$api。
我们看一下$api的定义:
//src/wx/nativeAPI.js

/**
 * @file nativeAPI
 * @author meixuguang
 */
/* global wx */
/* global swan */
import {makeNativeAPI} from '../base/nativeAPI';

export default makeNativeAPI(wx, '微信小程序');可以看到$api是调用makeNativeAPI函数生成的,函数传入了微信原生的api对象wx。然后我们看一下该函数的具体定义:
import { otherApis } from '../native-apis.js';

function promisify(fn, api) {

    return function (options, ...args) {
        options = options || {};
        let task = null;
        let obj = Object.assign({}, options);

        let pro = new Promise((resolve, reject) => {
            ['fail', 'success', 'complete'].forEach(k => {
                obj[k] = res => {
                    options[k] && options[k](res);
                    if (k === 'success') {
                        if (api === 'connectSocket') {
                            resolve(Promise.resolve().then(() => Object.assign(task, res)));
                        }
                        else {
                            resolve(res);
                        }
                    }
                    else if (k === 'fail') {
                        reject(res);
                    }

                };
            });

            task = fn(obj);
        });

        if (api === 'uploadFile' || api === 'downloadFile') {
            pro.progress = cb => {
                if (task) {
                    task.onProgressUpdate(cb);
                }

                return pro;
            };
            pro.abort = cb => {
                cb && cb();
                if (task) {
                    task.abort();
                }

                return pro;
            };
        }

        return pro;
    };
}

export function makeNativeAPI(pm, pmName) {
    let $api = Object.assign({}, pm);

    Object.keys(otherApis).forEach(api => {
        if (!(api in pm)) {
            $api[api] = () => {
                console.warn(`${pmName}暂不支持 ${api}`);
            };
            return;
        }

        $api[api] = promisify(pm[api], api);
    });

    return $api;
}该函数中输出是一个新的对象 $api,函数会遍历 otherApis 对象的所有键值,然后将传入的wx的该键值方法转为promise形式,如果 wx 对象中不存在某个方法,则该方法会输出一个警告信息。
其中otherApis的定义如下:
//src/native-apis.js
const otherApis = {
  // 网络
  request: true,
  uploadFile: true,
  downloadFile: true,
  connectSocket: true,
  sendSocketMessage: true,
  closeSocket: true,

  // 媒体
  chooseImage: true,
  previewImage: true,
  getImageInfo: true,
  saveImageToPhotosAlbum: true,
  startRecord: true,
  playVoice: true,
  getBackgroundAudioPlayerState: true,
  playBackgroundAudio: true,
  seekBackgroundAudio: true,
  chooseVideo: true,
  saveVideoToPhotosAlbum: true,
  loadFontFace: true,

  // 文件
  saveFile: true,
  getFileInfo: true,
  getSavedFileList: true,
  getSavedFileInfo: true,
  removeSavedFile: true,
  openDocument: true,

  // 数据缓存
  setStorage: true,
  getStorage: true,
  getStorageInfo: true,
  removeStorage: true,
  clearStorage: true,

  // 导航
  navigateBack: true,
  navigateTo: true,
  redirectTo: true,
  switchTab: true,
  reLaunch: true,

  // 位置
  getLocation: true,
  chooseLocation: true,
  openLocation: true,

  // 设备
  getSystemInfo: true,
  getNetworkType: true,
  makePhoneCall: true,
  scanCode: true,
  setClipboardData: true,
  getClipboardData: true,
  openBluetoothAdapter: true,
  closeBluetoothAdapter: true,
  getBluetoothAdapterState: true,
  startBluetoothDevicesDiscovery: true,
  stopBluetoothDevicesDiscovery: true,
  getBluetoothDevices: true,
  getConnectedBluetoothDevices: true,
  createBLEConnection: true,
  closeBLEConnection: true,
  getBLEDeviceServices: true,
  getBLEDeviceCharacteristics: true,
  readBLECharacteristicValue: true,
  writeBLECharacteristicValue: true,
  notifyBLECharacteristicValueChange: true,
  startBeaconDiscovery: true,
  stopBeaconDiscovery: true,
  getBeacons: true,
  setScreenBrightness: true,
  getScreenBrightness: true,
  setKeepScreenOn: true,
  vibrateLong: true,
  vibrateShort: true,
  addPhoneContact: true,
  getHCEState: true,
  startHCE: true,
  stopHCE: true,
  sendHCEMessage: true,
  startWifi: true,
  stopWifi: true,
  connectWifi: true,
  getWifiList: true,
  setWifiList: true,
  getConnectedWifi: true,

  // 界面
  showToast: true,
  showLoading: true,
  showModal: true,
  showActionSheet: true,
  setNavigationBarTitle: true,
  setNavigationBarColor: true,
  setTabBarBadge: true,
  removeTabBarBadge: true,
  showTabBarRedDot: true,
  hideTabBarRedDot: true,
  setTabBarStyle: true,
  setTabBarItem: true,
  showTabBar: true,
  hideTabBar: true,
  setTopBarText: true,
  startPullDownRefresh: true,
  canvasToTempFilePath: true,
  canvasGetImageData: true,
  canvasPutImageData: true,

  setBackgroundColor: true,
  setBackgroundTextStyle: true,

  // 第三方平台
  getExtConfig: true,

  // 开放接口
  login: true,
  checkSession: true,
  authorize: true,
  getUserInfo: true,
  checkIsSupportFacialRecognition: true,
  startFacialRecognitionVerify: true,
  startFacialRecognitionVerifyAndUploadVideo: true,
  faceVerifyForPay: true,
  requestPayment: true,
  showShareMenu: true,
  hideShareMenu: true,
  updateShareMenu: true,
  getShareInfo: true,
  chooseAddress: true,
  addCard: true,
  openCard: true,
  openSetting: true,
  getSetting: true,
  getWeRunData: true,
  navigateToMiniProgram: true,
  navigateBackMiniProgram: true,
  chooseInvoice: true,
  chooseInvoiceTitle: true,
  checkIsSupportSoterAuthentication: true,
  startSoterAuthentication: true,
  checkIsSoterEnrolledInDevice: true,

  setEnableDebug: true,

  // 百度小程序专有 API
  // 百度小程序 AI 相关
  ocrIdCard: true,
  ocrBankCard: true,
  ocrDrivingLicense: true,
  ocrVehicleLicense: true,
  textReview: true,
  textToAudio: true,
  imageAudit: true,
  advancedGeneralIdentify: true,
  objectDetectIdentify: true,
  carClassify: true,
  dishClassify: true,
  logoClassify: true,
  animalClassify: true,
  plantClassify: true,

  // 用户信息
  getSwanId: true,
  // 百度收银台支付
  requestPolymerPayment: true,
  // 打开小程序
  navigateToSmartProgram: true,
  navigateBackSmartProgram: true,
  preloadSubPackage: true
}就是微信小程序api的定义值。然后我们再看一下makePageMixin的定义:
//src/base/mixins.js

export function makePageMixin($api) {
    return {
        beforeCreate() {
            this.$api = $api;
        },
        created() {
            if (process.env.NODE_ENV !== 'production' && config.debug && config.debug.lifetimes) {
                console.log('[debug: Vue] created', this.compId);
            }
        },
        updated() {
            this.$emit('vm.updated');
        },
        mounted() {
            if (process.env.NODE_ENV !== 'production' && config.debug && config.debug.lifetimes) {
                console.log('[debug: Vue] mounted', this.compId);
            }
            this.$emit('vm.mounted');
        }
    };
}在beforeCreate钩子函数中,将传入的$api参数赋值给this.$api。这也是为什么我们能在vue中调用this.$api语法的方式来调用微信原生api的原因。
然后在updated钩子函数中,触发'vm.updated'事件。在mounted钩子函数中,触发'vm.mounted'事件。
makeCreatePage
该函数定义如下:
//src/wx/createPage.js
import pageMixin, {handleProxy, handleModel} from './mixins';
import {setData} from './data';
import {callHook} from './lifecycle';
import $api from './nativeAPI';
import config from '../config';
import {createVue, mountVue} from '../base/createPage';

function makeCreatePage(pageMixin, {handleProxy, handleModel}, setData, callHook) {
    return function (options) {
        options.mixins = [pageMixin];

        let initData = typeof options.data === 'function' ? options.data.call({
            $api
        }) : (options.data || {});

        return {
            data: initData,
            lifetimes: {
                attached(...args) {
                    createVue.call(this, options, args, {setData});

                    if (process.env.NODE_ENV !== 'production' && config.debug && config.debug.lifetimes) {
                        console.log('[debug: mp pageHooks] attached', this.__uid__);
                    }
                }
            },
            methods: {
                handleProxy,
                handleModel,
                onLoad(...args) {
                    if (process.env.NODE_ENV !== 'production' && config.debug && config.debug.lifetimes) {
                        console.log('[debug: mp pageHooks] onLoad', this.__uid__);
                    }
                    // 先 callHook 保证数据可以初始化
                    const ret = callHook.call(this, this.$vue, 'page', 'onLoad', args);
                    mountVue.call(this, this.$vue);
                    return ret;
                },
                onUnload(...args) {
                    if (process.env.NODE_ENV !== 'production' && config.debug && config.debug.lifetimes) {
                        console.log('[debug: mp pageHooks] onUnload', this.__uid__);
                    }
                    const ret = callHook.call(this, this.$vue, 'page', 'onUnload', args);
                    if (this.$vue) {
                        this.$vue.$destroy();
                    }
                    // on wx page unload will be triggered before component detached
                    setTimeout(_ => {
                        const pages = getApp().__pages__;
                        const uid = this.__uid__;
                        if (pages[uid]) {
                            pages[uid] = null;
                            delete pages[uid];
                        }

                    });
                    return ret;
                },
                onReady(...args) {
                    if (process.env.NODE_ENV !== 'production' && config.debug && config.debug.lifetimes) {
                        console.log('[debug: mp pageHooks] onReady', this.__uid__);
                    }
                    return callHook.call(this, this.$vue, 'page', 'onReady', args);
                },
                onShow(...args) {
                    if (process.env.NODE_ENV !== 'production' && config.debug && config.debug.lifetimes) {
                        console.log('[debug: mp pageHooks] onShow', this.__uid__);
                    }
                    return callHook.call(this, this.$vue, 'page', 'onShow', args);
                },
                onHide(...args) {
                    if (process.env.NODE_ENV !== 'production' && config.debug && config.debug.lifetimes) {
                        console.log('[debug: mp pageHooks] onHide', this.__uid__);
                    }
                    return callHook.call(this, this.$vue, 'page', 'onHide', args);
                },
                onPullDownRefresh(...args) {
                    return callHook.call(this, this.$vue, 'page', 'onPullDownRefresh', args);
                },
                onReachBottom(...args) {
                    return callHook.call(this, this.$vue, 'page', 'onReachBottom', args);
                },
                onShareAppMessage(...args) {
                    return callHook.call(this, this.$vue, 'page', 'onShareAppMessage', args);
                },
                onPageScroll(...args) {
                    return callHook.call(this, this.$vue, 'page', 'onPageScroll', args);
                },
                onTabItemTap(...args) {
                    return callHook.call(this, this.$vue, 'page', 'onTabItemTap', args);
                }
            }
        };
    };
}闭包函数里面的返回值和 Component API Typings基本保持一致。
首先将pageMixin添加到options.mixins数组中。
然后,根据options.data的类型判断是否为函数,如果是则将$api传递进去,否则将options.data或{}作为初始数据。
最后返回一个包含了页面数据、页面的生命周期和方法的对象。
在这个对象中,data属性为组件的内部数据,lifetimes属性为组件生命周期声明对象,methods属性为组件的方法,包括事件响应函数和任意的自定义方法。
在lifetimes属性中attached方法在组件实例进入页面节点树时执行触发,然后会调用createVue方法,并将小程序实例、options和setData传递进去。
我们看一下createVue的定义:
//src/base/createPage.js
import Vue from './vue/index';
import {mark, measure} from '../helper/perf';
import config from '../config';
import {state} from './state';

export function createVue(options, args, {setData}) {
    const pages = getApp().__pages__;
    //获取当前页面的 uid,App 初始化时 uid 为 -1
    const uid = this.__uid__ !== undefined ? this.__uid__ : ++pages.uid;
     // 存储页面实例对象
    pages[uid] = this;
    // 保存当前页面的 uid,Page 内部可以使用 __uid__ 变量获取 uid
    this.__uid__ = uid;

    if (process.env.NODE_ENV !== 'production' && config.performance && mark) {
        const perfTagStart = `${this.route}-start`;
        // const perfTagEnd = `${this.route}-end`;
        mark(perfTagStart);
    }

    if (state.store && !options.store) {
        options.store = state.store;
    }
    options.mpType = 'page';

    const vm = new Vue(options);

    vm.__vms__ = {};
    this.$vue = vm;
    vm.$mp = {
        scope: this,
        query: args[0],
        options: args[0]
    };
    vm.$on('vm.updated', _ => {
        setData(vm, this, true);
    });
    vm.$on('vm.mounted', _ => {
        setData(vm, this, true);
    });

    if (process.env.NODE_ENV !== 'production' && config.performance && mark) {
        const perfTagStart = `${this.route}-start`;
        const perfTagEnd = `${this.route}-end`;
        mark(perfTagEnd);
        measure(`${this.route}:new`, perfTagStart, perfTagEnd);
    }

    return vm;
}我们使用call调用createVue时改变其函数上下文this为小程序实例值。在函数内部,首先获取当前的小程序实例,并将其保存到pages对象中,以小程序实例的uid唯一标识作为键值。
然后将state.store添加到options中,将options.mpType属性设置为'page',这是因为这个函数是在创建页面时调用的。
接下来是最最重要的,创建一个新的Vue实例,设置__vms__属性为空对象,将vm实例保存到this.$vue属性中。给vm实例定义一个$mp对象,该对象包含了当前的小程序实例和一些其他属性。
然后,为vm实例添加两个事件监听器:vm.updated和vm.mounted,这两个事件是在上述createPage中pageMixin定义的updated和mounted函数调用触发。
在vm.updated事件触发时,调用传递进来的setData函数,将vm实例的数据更新到当前的小程序实例中。在vm.mounted事件触发时,再次调用setData函数,将vm实例的数据更新到当前的小程序实例中。
最后,返回创建的Vue实例。
可以看出在组件实例进入页面节点树时执行创建Vue实例并关联小程序实例。
methods组件的方法中定义了传入的参数handleProxy、handleModel,以及小程序页面的生命周期方法如下:
- onLoad方法会在页面加载时触发
- onUnload方法会在页面卸载时触发
- onReady方法会在页面准备好时触发
- onShow方法会在页面显示时触发
- onHide方法会在页面隐藏时触发
- onPullDownRefresh方法会在下拉刷新时触发
- onReachBottom方法会在滚动到底部时触发
- onShareAppMessage方法会在分享小程序时触发
- onPageScroll方法会在页面滚动时触发
- onTabItemTap方法会在点击tabItem时触发.
这些方法会在相应的生命周期或事件触发时被调用,并且这些生命周期都会调用callHook.call(this, this.$vue, 'page', 'onLoad', args);,其等价于 this.$vue.$options["onLoad"](args),相当于小程序生命周期触发时会调用Vue模版中定义的小程序生命周期函数。
其中callHook可以查看后面的生命周期讲解。
这几个方法中onLoad和onUnload除了调用Vue生命周期还做了其他操作。
在onLoad中调用了mountVue.call(this, this.$vue);我们看一下mountVue的定义:
//src/base/createPage.js
export function mountVue(vm) {
    if (process.env.NODE_ENV !== 'production' && config.performance && mark) {
        const perfTagStart = `${this.route}-start`;
        const perfTagEnd = `${this.route}-end`;
        mark(perfTagStart);
        vm.$mount();
        mark(perfTagEnd);
        measure(`${this.route}:mount`, perfTagStart, perfTagEnd);
    }
    else {
        vm.$mount();
    }
}mountVue的参数vm是在createVue中创建的vue实例,这里不难看出调用vue实例的$mount方法执行挂载的逻辑。所以在onLoad生命周期中开始执行Vue实例的挂载。
最后在onUnload页面卸载方法中,会判断this.$vue存在就调用$destroy方法进行销毁。然后设置了一个定时器,在定时器的回调函数中,我们尝试从全局对象getApp().__pages__中删除当前页面的引用。该页面引用是在createVue方法中赋值,在这里进行删除,避免内存泄露。
if (this.$vue) {
    this.$vue.$destroy();
}
// on wx page unload will be triggered before component detached
setTimeout(_ => {
    const pages = getApp().__pages__;
    const uid = this.__uid__;
    if (pages[uid]) {
        pages[uid] = null;
        delete pages[uid];
    }

});Component() 函数
Component() 函数编译
我们先来看看vue中的script是编译到小程序的代码:
//vue代码
<script>
export default {
    data(){
        return {
            msg: 'Hello Mars!'
        }
    },
    props: {
        helloText: {
            type: String,
            default: 'hello'
        }
    },
    lifetimes: {
        created() {},
        attached() {},
        ready() {},
        detached() {}
    },
    pageLifetimes: {
        show() {},
        hide() {}
    },
};
</script>小程序组件生成的代码有两个:
//hello.js
import comp from './Hello.vue';
import {createComponent} from '../../mars-core/index';
Component(createComponent(comp));

//hello.vue.js
import { vueCompCreator } from "../../mars-core/index";
export default vueCompCreator({
  data() {
    return {
      msg: 'Hello Mars!'
    };
  },
  props: {
    helloText: {
      type: String,
      default: 'hello'
    }
  },
  lifetimes: {
    created() {},
    attached() {},
    ready() {},
    detached() {}
  },
  pageLifetimes: {
    show() {},
    hide() {}
  },
  render: __renderFunction
});;
function __renderFunction() {return ({ render: function() {var _vm=this;var _h=_vm.$createElement;var _c=_vm._self._c||_h;return []}, staticRenderFns: [] }).render.bind(this)();
}我们再看看微信小程序原生 Component 构造器:
Component({
  behaviors: [],
  properties: {
    myProperty: {
      type: String,
      value: ""
    },
    myProperty2: String
  },
  // 私有数据,可用于模板渲染
  data: {},
  // 生命周期函数,可以为函数,或一个在methods段中定义的方法名
  lifetimes: {
    attached() {},
    moved() {},
    detached() {}
  },
  // 此处attached的声明会被lifetimes字段中的声明覆盖
  attached() {},
  ready() {},
  // 组件所在页面的生命周期函数
  pageLifetimes: {
    show() {},
    hide() {},
    resize() {}
  },
  methods: {
    onMyButtonTap() {},
    // 内部方法建议以下划线开头
    _myPrivateMethod() {
      // 这里将 data.A[0].B 设为 'myPrivateData'
      this.setData({
        "A[0].B": "myPrivateData"
      });
    },
    _propertyChange(newVal, oldVal) {}
  }
});可以看出小程序组件是调用了createComponent对参数进行了包装。
实例绑定
我们找到createComponent代码如下:
//src/wx/createComponent.js
import {
    getCompMixin,
    handleProxy,
    handleModel
} from './mixins';
import {setData} from './data';
import {callHook} from './lifecycle';
import $api from './nativeAPI';

import {
    makeCreateComponent,
    makeVueCompCreator
} from '../base/createComponent';

export const vueCompCreator = makeVueCompCreator(getCompMixin);
export default makeCreateComponent(
    handleProxy,
    handleModel,
    setData,
    callHook,
    {$api}
);其中makeCreateComponent函数的参数handleProxy,handleModel,setData,callHook,{$api}我们在createPage都有讲过。我们主要看一下makeCreateComponent、makeVueCompCreator和getCompMixin。
makeCreateComponent函数
makeCreateComponent函数定义如下:
export function makeCreateComponent(handleProxy, handleModel, setData, callHook, {
    $api
}) {
    return function (options) {
        // TODO initData 包括 vue 实例的 data defaultProps 和 computed
        let initData = typeof options.data === 'function' ? options.data() : (options.data || {});
        initData = Object.assign({
            __inited__: false
        }, initData);

        let props = normalizeProps(options.props);
        props = Object.assign(props, {
            compId: String,
            ref: String,
            rootComputed: Object,
            rootUID: {
                type: Number,
                value: -1
            }
        });

        let [VueComponent, vueOptions] = initVueComponent(Vue, options);

        return {
            __isComponent__: true,
            // for lifetimes before Vue mount
            $vue: {
                $api,
                $options: options
            },
            properties: props,
            data: initData,
            externalClasses: options.externalClasses || [],
            options: options.options || {},
            methods: {
                handleProxy,
                handleModel
            },
            pageLifetimes: {
                show(...args) {
                    // if (process.env.NODE_ENV !== 'production' && config.debug && config.debug.lifetimes) {
                    //     console.log('[debug: swan pageLifetimes] show', this.data.compId);
                    // }
                    return callHook.call(this, this.$vue, 'comp', 'show', args);
                },
                hide(...args) {
                    // if (process.env.NODE_ENV !== 'production' && config.debug && config.debug.lifetimes) {
                    //     console.log('[debug: swan pageLifetimes] hide', this.data.compId);
                    // }
                    return callHook.call(this, this.$vue, 'comp', 'hide', args);
                }
            },
            lifetimes: {
                created(...args) {
                    // console.log(this.$vue);
                    if (process.env.NODE_ENV !== 'production' && config.debug && config.debug.lifetimes) {
                        console.log('[debug: mp lifetimes] created', this.data.compId);
                    }
                    if (this.$vue) {
                        this.$vue.$mp = {
                            scope: this
                        };
                    }
                    callHook.call(this, this.$vue, 'comp', 'created', args);
                },
                attached(...args) {
                    if (process.env.NODE_ENV !== 'production' && config.debug && config.debug.lifetimes) {
                        console.log('[debug: mp lifetimes] attached', this.data.compId);
                    }
                    const page = getPageInstance(this);
                    this.$$__page__ = page;
                    // if (config.$platform === 'wx') {
                    mountVue.call(this, VueComponent, setData);
                    // }
                    callHook.call(this, this.$vue, 'comp', 'attached', args);
                },
                ready(...args) {
                    if (process.env.NODE_ENV !== 'production' && config.debug && config.debug.lifetimes) {
                        console.log('[debug: mp lifetimes] ready', this.data.compId);
                    }
                    callHook.call(this, this.$vue, 'comp', 'ready', args);
                },
                detached(...args) {
                    if (process.env.NODE_ENV !== 'production' && config.debug && config.debug.lifetimes) {
                        console.log('[debug: mp lifetimes] detached', this.data.compId);
                    }
                    callHook.call(this, this.$vue, 'comp', 'detached', args);
                    try {
                        this.$vue && this.$vue.$destroy();
                        // remove swan binded vue instance from root __vms__
                        const page = this.$$__page__;
                        const vms = page.$vue.__vms__;
                        vms[this.data.compId] = null;
                        delete this.$vue;
                        delete this.$$__page__;
                    }
                    catch (e) {
                        console.warn('component detached error', e, this);
                    }
                }
            }
        };
    };
}和createPage 类型类似,createComponent 闭包函数返回值是小程序 Component 构造函数的参数。
首先根据options.data的类型判断是否为函数,如果是则将调用函数获取数据,否则将options.data或{}作为初始数据。给初始数据添加__inited__属性为false。然后对props进行规范化处理,并为其添加以下对外暴露属性:
compId: String,
ref: String,
rootComputed: Object,
rootUID: {
    type: Number,
    value: -1
}然后调用initVueComponent方法对Vue组件进行初始化工作。
export function initVueComponent(Vue, vueOptions) {
    vueOptions = vueOptions.default || vueOptions;
    let VueComponent;
    if (typeof vueOptions === 'function') {
        VueComponent = vueOptions;
        vueOptions = VueComponent.extendOptions;
    }
    else {
        VueComponent = Vue.extend(vueOptions);
    }
    return [VueComponent, vueOptions];
}函数的目的是将Vue组件的创建过程封装起来,使得调用者不需要直接使用Vue.extend方法,只需要提供vueOptions即可。首先,它会检查vueOptions是否为一个函数,如果是,则将VueComponent设置为该函数,并将vueOptions设置为该函数的extendOptions属性。否则,它会使用Vue.extend方法创建一个新的Vue组件,并将其设置为VueComponent。
然后在返回的组件参数中设置了__isComponent__、$vue,并将$api和options添加到$vue中,然后在pageLifetimes组件所在页面生命周期和lifetimes组件生命周期中设置回调。
组件
- created:在组件实例刚刚被创建时执行
- attached:在组件实例进入页面节点树时执行
- ready:在组件在视图层布局完成后执行
- detached:在组件实例被从页面节点树移除时执行
页面
- show:组件所在的页面被展示时执行
- hide:组件所在的页面被隐藏时执行
其中,页面生命周期函数show和hide中调用了callHook.call(this, this.$vue, 'comp', 'show', args);等价于调用了this.$vue.$options.pageLifetimes["show"](args)。
组件生命周期函数中调用callHook则等价于调用了this.$vue.$options.lifetimes["show"](args)。
在组件created组件实例创建时为this.$vue赋予$mp属性,并将当前小程序组件实例赋值给$mp。
if (this.$vue) {
    this.$vue.$mp = {
        scope: this
    };
}在组件实例进入页面节点树时执行,先获取当前页面实例,然后赋值给当前组件实例的$$__page__属性,然后调用mountVue方法。
const page = getPageInstance(this);
this.$$__page__ = page;
// if (config.$platform === 'wx') {
mountVue.call(this, VueComponent, setData);该mountVue方法和page的mountVue方法不同,我们看一下定义:
function mountVue(VueComponent, setData) {
    const properties = this.properties;
    // 处理父子关系
    // 根据 rootUID 找到根元素,进而找到 page 中的 __vms__
    // 根据 compId 算出父实例的 comId
    // const rootUID = this.data.rootUID;
    // const rootMp = getApp().__pages__[rootUID];
    // const rootMp = getPageInstance(this);
    const rootMp = this.$$__page__;

    // for swan new lifecycle-2-0
    // will create page vm before component vm
    if (config.$platform === 'swan' && rootMp && !rootMp.$vue) {
        rootMp.$$__createVue__ && rootMp.$$__createVue__.call(rootMp);
        delete rootMp.$$__createVue__;
    }

    const currentCompId = properties.compId;
    const parentCompid = currentCompId.slice(0, currentCompId.lastIndexOf(','));
    let parent;
    if (parentCompid === '$root') {
        parent = rootMp.$vue;
    }
    else {
        parent = rootMp.$vue.__vms__[parentCompid];
        if (!parent) {
            console.warn('cannot find Vue parent component for: ', this);
        }
    }

    const options = {
        mpType: 'component',
        mpInstance: this,
        propsData: properties,
        parent,
        compId: currentCompId
    };

    // TODO: check if is ok when swan instance reused with trackBy
    // 初始化 vue 实例
    this.$vue = new VueComponent(options);
    this.$vue.$mp = {
        scope: this
    };

    this.$vue.$on('vm.updated', _ => {
        setData(this.$vue, this);
    });
    this.$vue.$on('vm.mounted', _ => {
        setData(this.$vue, this);
    });

    // 触发首次 setData
    this.$vue.$mount();
    this.__created__ = true;
    if (this.__cbs__ && this.__cbs__.length > 0) {
        this.__cbs__.forEach(([handleName, args]) => {
            this.$vue[handleName] && this.$vue[handleName].apply(this.$vue, args);
        });
    }
}首先获取了当前组件的属性,并找到了根元素。然后,我们根据当前组件的compId找到了其父组件的compId。接着,我们根据父组件的compId找到了父组件的Vue实例。
接下来,我们创建了一个新的Vue实例,并将小程序实例赋值到$vue的$mp属性。我们还为这个Vue实例添加了一些事件监听器,以便在Vue实例更新或挂载后触发setData函数。这部分和page一样。
最后,我们调用了Vue实例的$mount方法,以将__created__属性设置为true,以表示这个Vue实例已经被创建。然后遍历__cbs__数组,并在Vue实例上调用相应的处理函数。
在组件实例被从页面节点树移除时,调用vue实例的$destroy()销毁方法,然后删除$$__page__、$vue的相关引用,避免内存泄露
this.$vue && this.$vue.$destroy();
// remove swan binded vue instance from root __vms__
const page = this.$$__page__;
const vms = page.$vue.__vms__;
vms[this.data.compId] = null;
delete this.$vue;
delete this.$$__page__;makeVueCompCreator
该函数参数为getCompMixin,其定义为:
//src/wx/mixins.js
import {makePageMixin, makeGetCompMixin} from '../base/mixins';
export const getCompMixin = makeGetCompMixin($api);//src/base/mixin.js
export function makeGetCompMixin($api) {
return function getCompMixin(options) {
return {
props: {
compId: String,
ref: String
},
beforeCreate() {
this.$api = $api;
this.$options = Object.assign(this.$options, {
pageLifetimes: options.pageLifetimes,
lifetimes: options.lifetimes
});
},
created() {
if (process.env.NODE_ENV !== 'production' && config.debug && config.debug.lifetimes) {
console.log('[debug: Vue] created', this.compId);
}
const vms = this.$root.__vms__;
vms[this.compId] = this;
// vms[this.compId] = vms[this.compId] || {cur: -1, curSwan: -1};
// const curIndex = ++vms[this.compId].cur;
// vms[this.compId][curIndex] = this;
// 此时还没有 .$mp
// this.$options.mpInstance.__curSwan__ = curIndex;
registerRef(this, this.ref);
},
destroyed() {
registerRef(this, this.ref, true);
},
watch: {
ref(newVal, val) {
if (val !== newVal) {
registerRef(this, val, true);
registerRef(this, newVal);
return;
}
}
},
updated() {
this.$emit('vm.updated');
},
mounted() {
if (process.env.NODE_ENV !== 'production' && config.debug && config.debug.lifetimes) {
console.log('[debug: Vue] mounted', this.compId);
}
this.$emit('vm.mounted');
}
};
};
}最后返回的mixins值和page中的mixins类似,在beforeCreate中将$api保存到实例上,然后将options中的pageLifetimes和lifetimes合并到实例的$options上。
在created中将实例的compId保存到实例的$root.__vms__对象上,并将实例保存到实例的$root.__vms__对象上。
在updated钩子中,触发vm.updated事件。在mounted钩子中,触发vm.mounted事件。
然后我们在看一下makeVueCompCreator函数:
//src/base/createComponent.js
export function makeVueCompCreator(getCompMixin) {
    return function vueCompCreator(options) {
        // 如果 options(vue组件的代码)中已有 mixins,则同时保留 options中的 mixins
        options.mixins = [getCompMixin(options), ...options.mixins || []];
        return options;
    };
}函数的作用是将 getCompMixin 函数返回的 mixin 添加到 options.mixins 数组中,并返回 options。
如果 options.mixins 已经存在,则将其添加到 getCompMixin 函数返回的 mixin 之后。如果 options.mixins 不存在,则将 getCompMixin 函数返回的 mixin 设置为 options.mixins。
Vue Runtime 与小程序生命周期映射
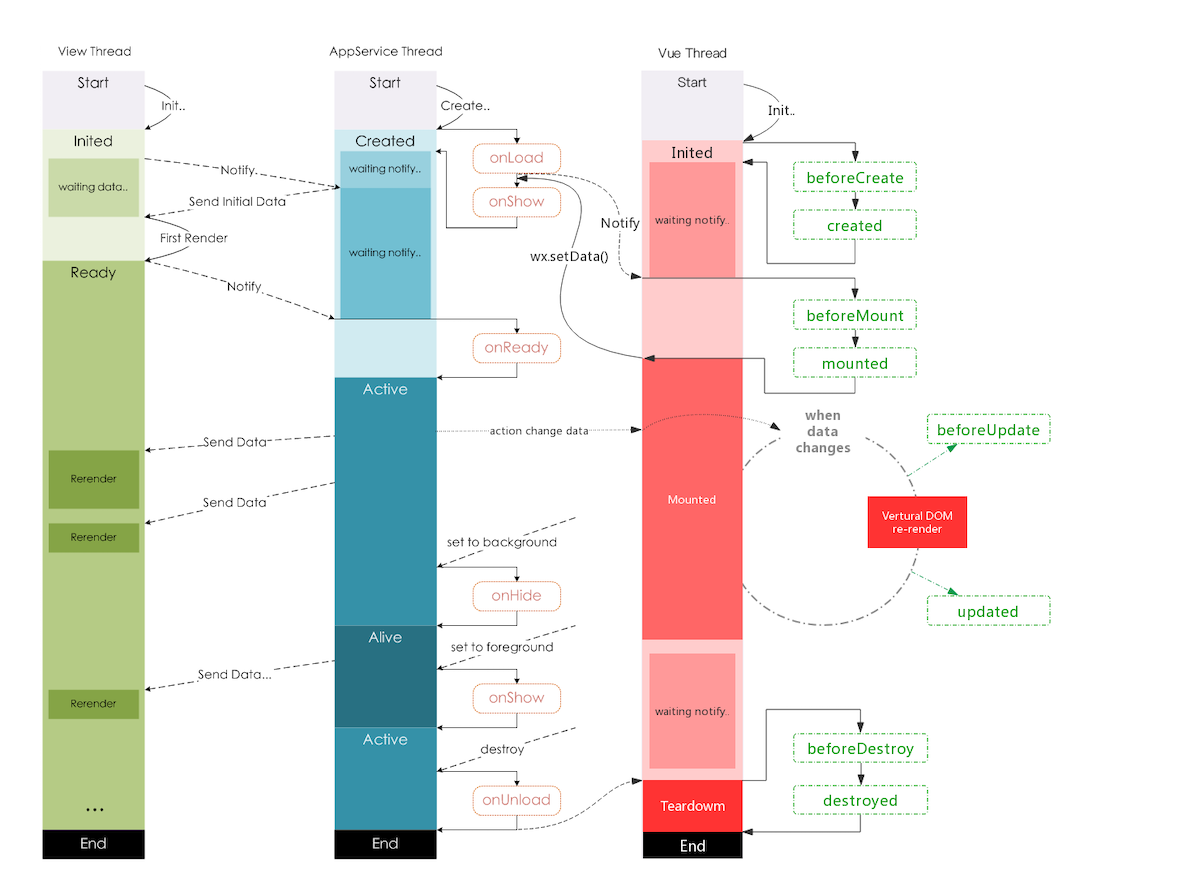
我们的 Vue Runtime 是运行在小程序基础库之上的,小程序生命周期与 Vue 生命周期存在一定的差异,那么是如何建立联系的呢?主要通过 callHook 方法建立了生命周期的映射。
@mars/core 中 callHook 源码实现如下:
//src/base/lifecycle.js
// 小程序page生命周期
const PAGE_LIFECYCLE_HOOKS = {
    'onLoad': true,
    'onReady': true,
    'onShow': true,
    'onHide': true,
    'onUnload': true,
    'onForceRelaunch': true,
    'onPullDownRefresh': true,
    'onReachBottom': true,
    'onShareAppMessage': true,
    'onPageScroll': true,
    'onTabItemTap': true,
    'onBeforePageBack': true
};

// 小程序component生命周期
const COMP_LIFECYCLE_HOOKS = {
    pageLifetimes: {
        'show': true,
        'hide': true
    },
    lifetimes: {
        'created': true,
        'attached': true,
        'ready': true,
        'detached': true
    }
};

/**
 * 吊起小程序生命周期函数
 *
 * @param {Object} vm - vue实例
 * @param {string} type - 实例类型 页面、组件:枚举值 page | comp
 * @param {string} hook - 生命周期钩子
 * @param {Object} args - 参数
 * @return {Object} 返回参数
 */
export function callHook(vm, type, hook, args) {
    if (!vm) {
        // const vms = this.pageinstance && this.pageinstance.$vue.__vms__;
        // console.warn('[swan instance mismatch]', this, vms);
        return;
    }
    let handler = null;
    if (type === 'comp') {
        handler = COMP_LIFECYCLE_HOOKS.pageLifetimes[hook]
            ? vm.$options.pageLifetimes && vm.$options.pageLifetimes[hook]
            : vm.$options.lifetimes && vm.$options.lifetimes[hook];
    }
    else {
        handler = vm.$options[hook];
    }
    if (handler) {
        return handler.apply(vm, args);
    }
}这段代码主要是为了帮助开发者调用小程序的生命周期函数。在小程序中,每个页面和每个自定义组件都有自己的生命周期函数,这些函数可以帮助开发者在页面或组件的不同阶段执行特定的操作。
在这段代码中,我们定义了两个对象:PAGE_LIFECYCLE_HOOKS和COMP_LIFECYCLE_HOOKS,分别用于存储页面和组件的生命周期函数。
然后,我们定义了一个函数callHook,它接受四个参数:vm、type、hook和args.vm是vue实例,type是实例类型(页面或组件),hook是生命周期钩子,args是参数。
在函数内部,我们首先检查vm是否为空,如果为空,则返回。
然后,我们根据type的值来判断是否是组件。如果是组件,我们会根据hook的值来判断是否是pageLifetimes中的钩子,如果是pageLifetimes中的钩子,则从vm.$options.pageLifetimes中获取对应的钩子函数,如果不是pageLifetimes中的钩子,则从vm.$options.lifetimes中获取对应的钩子函数。
如果不是组件,我们则直接从vm.$options中获取对应的钩子函数。
最后调用handler.apply(vm, args),并返回调用结果。
这样,我们就可以通过调用callHook函数来吊起小程序的生命周期函数了。
Tips: Vue 源码中也有 callHook 的实现:lifecycle callHook
Vue Runtime 与小程序事件代理
handleProxy
上面的例子中我们可以看到编译过程 Vue 中的事件处理指令进行了转换,将 @tap="showInfo" 转换成 bindtap="handleProxy" 和data-tapeventproxy="showInfo"。我们找到其源码定义如下:
//src/base/mixins.js
export function handleProxy(event) {
    if (process.env.NODE_ENV !== 'production' && config.debug && config.debug.events) {
        console.log('[debug: handleProxy]', this.data.compId, event);
    }
    // get event dataSet
    const data = event.currentTarget.dataset;
    const eventType = event.type;

    if (event.target.id !== event.currentTarget.id && data[`${eventType}ModifierSelf`]) {
        return;
    }

    const realHandler = data[`${eventType}eventproxy`.toLowerCase()];
    if (eventType && realHandler) {
        const detail = event.detail || {};
        let {trigger, args = []} = detail;
        if (trigger !== '$emit') {
            args = [event];
        }
        // args via argumentsproxy
        let argumentsproxy = data[`${eventType}argumentsproxy`.toLowerCase()];
        if (argumentsproxy) {
            // inline $event can pass only 1 parameter, won't support `...arguments`
            // see https://github.com/vuejs/vue/issues/5527
            args = argumentsproxy.map(a => a === '_$event_' ? args[0] : a);
        }

        // swan 组件的事件可能在其 created 生命周期前触发,此时 this.$vue 还没有绑定上
        if (this.__isComponent__ && !this.__created__) {
            this.__cbs__ = this.__cbs__ || [];
            this.__cbs__.push([realHandler, args]);
            return;
        }

        if (!this.$vue) {
            const page = getPageInstance(this);
            const vms = page.$vue.__vms__;
            console.warn('[swan instance mismatch]', this.data.compId, this, vms);
            return;
        }

        if (this.$vue[realHandler]) {
            this.$vue[realHandler].apply(this.$vue, args);
        }
    }
}这段代码是一个事件处理函数,用于处理小程序组件的事件。它获取事件的数据集,并获取事件的类型。
数据集这块在微信小程序中,当我们点击事件时在事件函数中获取event.currentTarget,他有两个属性:id表示当前组件的id、dataset表示当前组件上由data-开头的自定义属性组成的集合。
例如:
<view data-alpha-beta="1" data-alphaBeta="2" bindtap="bindViewTap"> DataSet Test </view>
Page({
  bindViewTap:function(event){
    event.currentTarget.dataset.alphaBeta === 1 // - 会转为驼峰写法
    event.currentTarget.dataset.alphabeta === 2 // 大写会转为小写
  }
})
mark如果事件的目标元素不是当前元素,并且当前元素的数据集中存在与事件类型相关的修饰符,则返回。
然后获取与事件类型相关的真实处理函数,如果事件类型存在且真实处理函数存在,则执行以下操作:
- 获取事件的详细信息,包括触发器和参数。
- 如果触发器不是'$emit',则将事件作为参数传递。
- 获取与事件类型相关的参数代理,如果存在,则将其映射到参数列表中
- 如果当前组件是一个小程序组件,并且尚未创建,则将事件处理函数和参数存储在组件的回调列表中
- 如果当前组件的vue实例存在,并且存在与真实处理函数相对应的处理函数,则调用该处理函数,并传递参数。
例如我们编译后的小程序视图代码为:
<view class="home-wrap">
    <view wx:if="{{ isShow }}" bindtap="handleProxy" data-tapeventproxy="clickTap">内容</view>
</view>bindtap点击事件最终调用了handleProxy,在handleProxy中会拿到event.currentTarget.dataset和event.type,然后调用dataset的${eventType}eventproxy拿到自定义的事件名clickTap。最终调用this.$vue的事件方法触发定义在vue中的事件,这样就能够将小程序视图与Vue运行时事件关联。
handleModel
handleModel也是类似,我们看一下代码:
//src/base/mixins.js
export function handleModel(event) {
    const type = event.type;
    let ct = event.currentTarget;
    let {
        dataset: {
            model,
            tag
        }
    } = ct;

    if (!model) {
        return;
    }

    if (
        type === 'input'
        || (type === 'change' && tag === 'picker')
        || (type === 'change' && tag === 'radio')
    ) {
        setObjectData(this.$vue, model, event.detail.value);
    }
    else if (type === 'change' && tag === 'switch') {
        setObjectData(this.$vue, model, event.detail.checked);
    }
}函数获取事件的类型和当前目标元素,检查当前目标元素是否有model属性。如果事件的类型是input或者change且目标元素的tag属性是picker或者radio,函数会调用setObjectData函数,将事件的详细信息(value)传递给model属性。
如果事件的类型是change且目标元素的tag属性是switch,函数会调用setObjectData函数,将事件的详细信息(checked)传递给model属性。
Vue Runtime 与小程序数据同步
小程序的视图层目前使用 WebView 作为渲染载体,而逻辑层是由独立的 JavascriptCore 作为运行环境。在架构上,WebView 和 JavascriptCore 都是独立的模块,并不具备数据直接共享的通道。当前,视图层和逻辑层的数据传输,实际上通过两边提供的 evaluateJavascript 所实现。即用户传输的数据,需要将其转换为字符串形式传递,同时把转换后的数据内容拼接成一份 JS 脚本,再通过执行 JS 脚本的形式传递到两边独立环境。而 evaluateJavascript 的执行会受很多方面的影响,数据到达视图层并不是实时的。
Vue 框架如何渲染?
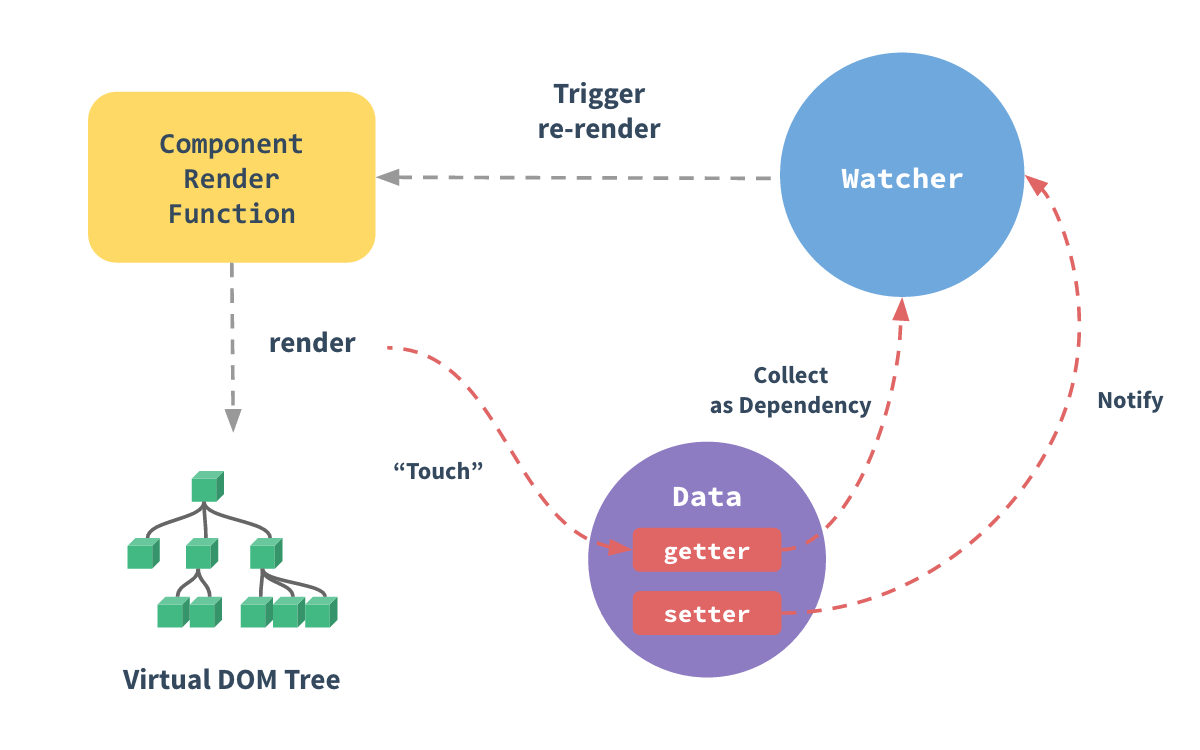
每个组件实例都对应一个 watcher 实例,它会在组件渲染的过程中把“接触”过的数据属性记录为依赖。之后当依赖项的 setter 触发时,会通知 watcher,从而使它关联的组件重新渲染。
小程序视图层如何渲染?
视图层在接收到初始数据(data)和更新数据(setData 数据)时,需要进行视图层渲染。在一个页面的生命周期中,视图层会收到一份初始数据和多份更新数据。收到初始数据时需要执行初始渲染,每次收到更新数据时需要执行重渲染。
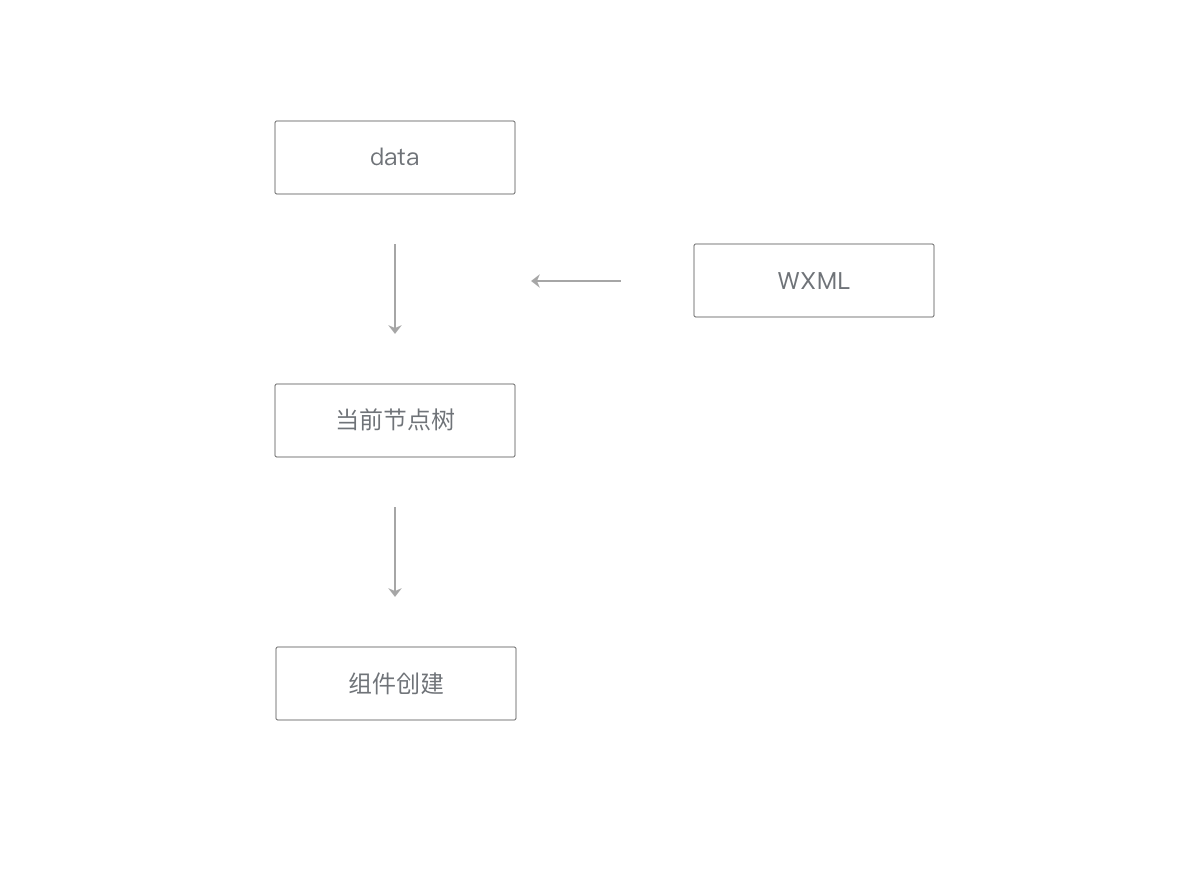
初始渲染完毕后,视图层可以多次应用 setData 的数据。每次应用 setData 数据时,都会执行重渲染来更新界面。
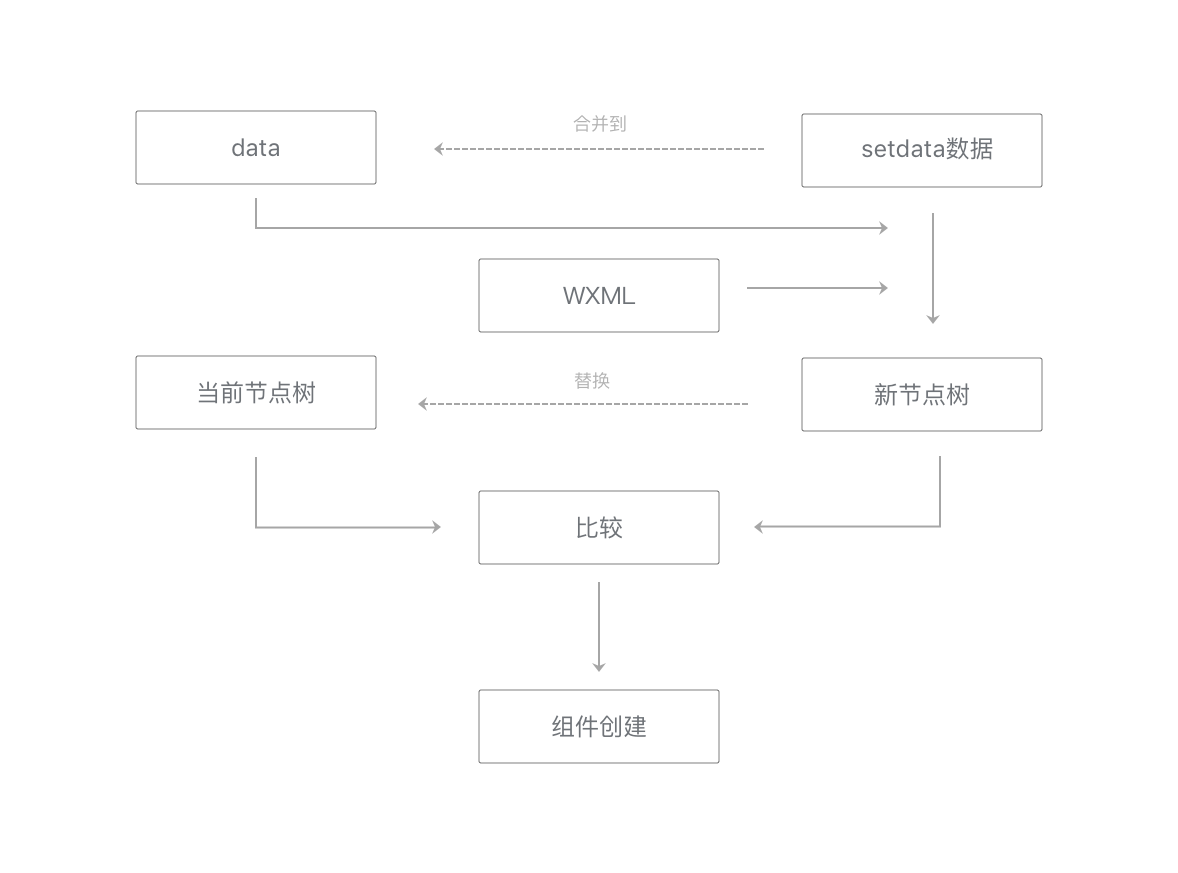
分析上面的代码我们发现 Page 在小程序的 onLoad 钩子函数中,Vue 实例的 vm.updated 和 vm.mounted 监听事件会执行 setData(vm, this, true); 方法,这里的第一个参数是 Vue 的实例,第二个参数是小程序 Page 实例,第三个参数标志是操作 Page 的 data 对象。
setData 实现如下:
//src/base/data.js
import {mark, measure} from '../helper/perf';
import deepEqual from '../helper/deepEqual';
import config from '../config';
import {getMpUpdatedCallbacks} from './api/mpNextTick';

function cleanKeyPath(vm) {
    if (vm.__mpKeyPath) {
        Object.keys(vm.__mpKeyPath).forEach(_key => {
            delete vm.__mpKeyPath[_key].__changedKeys__;
            delete vm.__mpKeyPath[_key].__changed__;
        });
        delete vm.__mpKeyPath;
    }
}

export function setData(vm, $mp, isRoot = false) {
    let perfTagPre;
    if (process.env.NODE_ENV !== 'production' && config.performance && mark) {
        perfTagPre = `${vm._uid}-(${vm.compId})-${Date.now()}`;
        const perfTagStart = `${perfTagPre}-data-start`;
        mark(perfTagStart);
    }
    let data = {};
    data = getFiltersData(vm, $mp, data);

    if (!vm.__swan_inited__) {
        vm.__swan_inited__ = true;
        data = getData(vm, data);
        // compare initial data with $mp data
        // 从 swan properties 和 data 取到的初始数据都是 plain Object 不是 Vue 数据的引用
        data = compareInitialData($mp, data);

        if (isRoot) {
            // const rootComputed = getAllComputed(vm);
            // data.rootComputed = rootComputed;
            data.rootUID = $mp.__uid__;
        }
    }
    else {
        // call cleanKeyPath immediately when scheduler.updatedQueueFlushed
        vm.$root.$once('scheduler.updatedQueueFlushed', () => cleanKeyPath(vm));

        const changed = getChangedData(vm, vm._data);
        const computed = getChangedComputed(vm);
        data = Object.assign(data, computed, changed);
    }

    if (process.env.NODE_ENV !== 'production' && config.performance && mark) {
        const perfTagStart = `${perfTagPre}-data-start`;
        const perfTagEnd = `${perfTagPre}-data-end`;
        mark(perfTagEnd);
        measure(`${perfTagPre}-data-collect`, perfTagStart, perfTagEnd);
    }

    if (Object.keys(data).length > 0) {
        if (process.env.NODE_ENV !== 'production' && config.performance && mark) {
            // const perfTagPre = `${vm.$root.$mp.scope.__uid__}$${vm._name}`;
            const size = JSON.stringify(data).length / 1024;
            const perfTagStart = `${perfTagPre}-updated-start`;
            const perfTagEnd = `${perfTagPre}-updated-end`;

            mark(perfTagStart);

            const flushMpUpdatedCallbacks = getMpUpdatedCallbacks(vm);
            $mp.setData(data, () => {
                mark(perfTagEnd);
                measure(`${perfTagPre}-mpUpdated`, perfTagStart, perfTagEnd);
                flushMpUpdatedCallbacks();
            });
            console.info('[perf: setData]', perfTagPre, (size).toFixed(3) + 'KB', data);
        }
        else {
            const flushMpUpdatedCallbacks = getMpUpdatedCallbacks(vm);
            // console.log('[perf setData]:', data);
            $mp.setData(data, () => {
                flushMpUpdatedCallbacks();
            });
        }
    }
}

/**
 * compare Initial data with $mp.data and omit the same data
 *
 * @param {Object} $mp swan instance
 * @param {Object} data collected data from vm
 * @return {Object} data omited
 */
function compareInitialData($mp, data) {
    const mpData = $mp.data;
    Object.keys(data).forEach(key => {
        let mpVal = mpData[key];
        if (mpVal !== undefined && deepEqual(data[key], mpVal)) {
            delete data[key];
        }
    });

    return data;
}

function compareAndSetData(k, val, old, key, data) {
    if (!deepEqual(val, old)) {
        data[`_f_.${k}.` + key] = val;
    }
}


function getFiltersData(vm, $mp, data = {}) {
    if (vm._fData) {
        const originFData = $mp.data._f_;
        if (!originFData) {
            data._f_ = {};
        }
        Object.keys(vm._fData).forEach(k => {
            // if vnode equals null, means its vif equals false
            let f = vm._fData[k];
            const {_t, _p, _if, _for} = f;

            const curData = originFData && originFData[k];
            if (!curData) {
                let kData = f;
                if (originFData) {
                    const key = `_f_.${k}`;
                    data[key] = kData;
                }
                else {
                    data._f_[k] = kData;
                }
            }
            else {
                _if !== undefined && compareAndSetData(k, _if, curData._if, '_if', data);
                _for !== undefined && compareAndSetData(k, _for, curData._for, '_for', data);
                // compare texts
                _t !== undefined && compareAndSetData(k, _t + '', curData._t, '_t', data);

                // compare props
                if (_p) {
                    Object.keys(_p).forEach(key => {
                        compareAndSetData(k, _p[key], curData._p[key], `_p.${key}`, data);
                    });
                }
            }
        });
    }
    return data;
}

function getData(vm, data = {}) {
    const dataKeys = getKeys(vm);
    dataKeys.forEach(key => {
        data[key] = vm[key];
    });
    // reset __changedKeys__
    if (vm._data.__ob__ && vm._data.__ob__.__changedKeys__) {
        const ob = vm._data.__ob__;
        ob.__changedKeys__ = null;
        delete ob.__changedKeys__;
    }

    return data;
}

function getKeys(vm) {
    return [].concat(
        Object.keys(vm._data || {}),
        // Object.keys(vm._props || {}),
        Object.keys(vm._computedWatchers || {})
    );
}

function getChangedData(vm, _data, keyPath = '', ret = {}) {
    const {__ob__: ob} = _data;
    if (!ob) {
        return ret;
    }
    const {__changedKeys__: changedKeys, __isArray__: isArray} = ob;
    vm.__mpKeyPath = vm.__mpKeyPath || {};

    if (ob.__changed__ || ob.__changedKeys__) {
        vm.__mpKeyPath[ob.dep.id] = ob;
    }
    // wx 通过下标更新数组有问题 暂时全部更新
    if (
        ob.__changed__
        || (config.$platform === 'wx' && ob.__isArray__ && changedKeys)
    ) {
        ret[keyPath] = _data;
    }
    else {
        Object.keys(_data).forEach(key => {
            const data = _data[key];
            let path = (keyPath ? `${keyPath}.` : '') + key;
            if (changedKeys && changedKeys[key]) {
                ret[path] = data;
            }
            else if (data instanceof Object) {
                getChangedData(vm, data, path, ret);
            }
        });
    }
    return ret;
}

function getChangedComputed(vm) {
    let data = {};
    Object.keys(vm._computedWatchers || {}).forEach(key => {
        const watcher = vm._computedWatchers[key];
        if (watcher.__changed__) {
            data[key] = vm[key];
            delete watcher.__changed__;
        }

    });
    return data;
}setData方法很简单,刚开始做了很多数据处理,然后调用getMpUpdatedCallbacks获取小程序数据更新的回调。我们看一下定义:
//src/base/api/mpNextTick.js
const callbacks = new Map();

function copyAndResetCb(key) {
    let cbs = callbacks.get(key) || [];

    if (cbs.length > 0) {
        const copies = cbs.slice(0);
        callbacks.delete(key);
        cbs.length = 0;
        return copies;
    }

    return [];
}

export function getMpUpdatedCallbacks(vm) {
    const copies = copyAndResetCb(vm);
    const globalCopies = copyAndResetCb('__global');

    return function () {
        for (let i = 0; i < copies.length; i++) {
            copies[i]();
        }
        for (let i = 0; i < globalCopies.length; i++) {
            globalCopies[i]();
        }
    };
}函数中获取与vm相关联的回调函数数组copies,并获取与'__global'相关联的回调函数数组globalCopies。然后,我们遍历copies数组和globalCopies数组,并依次调用每个回调函数。
最后调用小程序的setData方法,传递数据和回调函数,在回调函数中调用flushMpUpdatedCallbacks方法。
那么有触发回调的方法,在哪里定义监听回调呢?
在Mars中Vue运行时新增了一个API$mpUpdated。我们看一下其定义:
//src/base/vue/index.js
import Vue from './vue.runtime.esm';
import {mpUpdated} from '../api/mpNextTick';

Vue.prototype.$mpUpdated = function (fn) {
    return mpUpdated(fn, this);
};

export default Vue;该方法来注册小程序数据更新视图渲染完成后的回调。其中mpUpdated定义如下:
//src/base/api/mpNextTick.js
export function mpUpdated(cb, ctx) {
    let key = (ctx && ctx._isVue === true) ? ctx : '__global';

    let cbs = callbacks.get(key) || [];

    /* eslint-disable fecs-camelcase */
    let _resolve;
    cbs.push(() => {
        if (cb) {
            try {
                cb.call(ctx);
            }
            catch (e) {
                throw new Error(e);
            }
        }
        else if (_resolve) {
            _resolve(ctx);
        }
    });

    callbacks.set(key, cbs);

    if (!cb && typeof Promise !== 'undefined') {
        return new Promise(resolve => {
            _resolve = resolve;
        });
    }
    /* eslint-enable fecs-camelcase */
}该函数定义了一个变量key,如果ctx存在且ctx._isVue为true,则将key设置为ctx,否则将key设置为'__global'。从callbacks Map对象中获取key对应的回调函数数组cbs,将一个新的回调函数push到cbs数组中。新的回调函数会执行以下操作:
- 如果cb存在,则调用cb.call(ctx)
- 如果cb不存在,则调用_resolve(ctx)
最后,将cbs数组保存到callbacks Map对象中,并返回一个Promise对象。
Vue Runtime定制
mpvue 通过拓展 Vue platform 的方式,增加了 mp 平台的代码,对 Vue Runtime 进行了较多的修改,且将小程序编译的逻辑写在 src/platforms/mp 中。uni-app / mars 都只对 Vue 进行了轻度修改,且编译器的逻辑并没有写在 Vue 源码中,这样便于后期维护编译器代码,同时 Vue 3.0 里面会拆分成多个包,Vue 3.0 的 Runtime 原则上默认就会支持。
基于这几点考虑 mars 在 Vue Runtime 没有做过多的修改,直接复用 mars 基于 vue@2.5.21 fork 修改版本。mars-vue: https://github.com/max-team/mars-vue
mars-vue 主要做了几处修改:
- 去掉 Browser 环境代码,remove dom ops/methods and modify patch method: https://github.com/max-team/mars-vue/commit/8cbda2d02d30f8c5f05508710a20d2cf58d15bfb
- 增加 data 和 计算属性的变动追踪,add changed track for data and computedWatcher: https://github.com/max-team/mars-vue/commit/6ffa5d9055534a7aeb62f792b5efc59216e6f4b4
- 增加过滤器(filters) 机制,bind vnode with filters to vm for Mars filters: https://github.com/max-team/mars-vue/commit/ff81badcead341e20f8572fb2e9263aa27d3563f